Whether you love houseplants or just getting into the game, no collection is complete without a Monstera. Unfortunately, these prolific climbers can sometimes be hard to come by.
But don’t worry. Learning how to air layer Monstera can get you exactly what you need.
Air layering summer-long stem tips from adult plants bring increased success versus starting from seed and guarantees fresh cuttings bursting with life for propagation.
In this blog post, I’ll explain the process of air layering Monstera plants. It’s easy enough for anyone, whether a novice plant parent or a green thumb enthusiast.
How to Air Layer Monstera
- Step 1: Identify an aerial root and decide where to cut
- Step 2: Apply a substrate (sphagnum moss)
- Step 3: Wrap the moss around the stem, node, or aerial root
- Step 4: Keep the moss damp
- Step 5: Plant your cutting
How to Propagate Monstera
Propagating Monstera deliciosa is simple and effective in creating new plants. There’re three main ways of propagating this plant: division, stem cuttings, or air layering.
Before I get into the details, do you know what propagation is?
Propagation is the process of creating new plants from existing ones. Each method requires a different set of tools and techniques.
The basic principle remains the same: taking a part of an existing plant and encouraging it to grow roots or shoots of its own.
Propagation helps you to create more plants from a single mother plant. This is useful for plants that are hard to find or expensive to buy.
Maintaining a consistent supply of plants for personal use or sale is also important.
Propagation is also a great way to rejuvenate old or struggling plants.
By taking cuttings or divisions, you can start fresh with new, healthy growth better suited to their growing conditions.
Propagation will also allow you to experiment with different techniques and growing methods and can be a fun and rewarding hobby in its own right.

Method 1: Air Layering
What is air layering Monstera?
Air layering Monstera is a propagation process that encourages root growth from the stem of Monstera plants.
This method ensures that the new plants will have better chances of survival since they can grow their roots without undergoing transplant shock.
How to air layer a Monstera Deliciosa
What you’ll need
- Monstera Deliciosa stem or cutting
- Potting soil or sphagnum moss
- Plastic wrap
- Scissors or knife
- Distilled water
Steps

Step 1: Identify an aerial root and decide where to cut
Before starting the process, identify an aerial root on your parent plant. This is where you’ll make a cut and apply the plastic wrap for better insulation.
The aerial root should be at least 2-3 inches long and have some good leaves.
Step 2: Make a shallow cut around the aerial root
Make a shallow ring-shaped cut around the aerial root using a sharp knife or scissors. The goal is to separate the stem from the leaves and ensure enough space for future roots to grow.
Do this in an even and gentle manner. While cutting, be careful not to cut too deep or damage the stem.
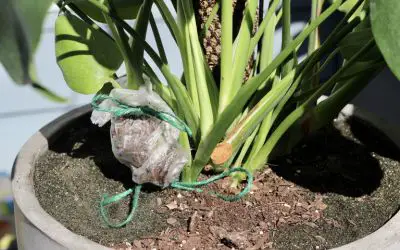
Step 3: Wrap the moss around the stem, node or aerial root
Moisten the sphagnum moss and wrap it around the cut portion of the stem. This will help trap moisture to encourage root growth.
Ensure it’s firmly wrapped around the stem and secured with plastic wrap.
Step 4: Keep the moss damp
Keep the moss damp by misting it with water every couple of days. You can also cover the plastic wrap with aluminium foil to protect it from sun damage further and help retain moisture.
Step 5: Plant your cutting once the roots have formed
Once you see new roots forming, it’s time to transplant your Monstera Deliciosa cutting into potting soil. Ensure you water the soil regularly until the new plant is well-established.
Pros and Cons of air layering
Pros
- It’s a simple and highly successful propagation method
- It can be used on woody plants such as trees and shrubs that would otherwise be difficult to propagate from cuttings
- By growing the roots before transplanting, it helps reduce any shock caused by the transplantation process
Cons
- It requires patience since the process can take weeks to months to see any results.
- You must keep the moss moist throughout the process, or it won’t form new roots.
- If done incorrectly, it can lead to root rot or disease.
Method 2: Division/Separation
Another method of Monstera propagation is division/separation. This process involves carefully splitting the rootball into two or more parts with sharp, clean tools.
Each section should have its own root system growing and at least one aerial node (the portion of the stem where foliage emerges). Allow the cuttings to be callous for a few days before planting.
Plant in well-draining soil and provide good air circulation to prevent root rot. Once the divisions have been established, give them plenty of light and water them regularly until they are actively growing again.
Pros and cons of division
Pros
- Simple and effective
- Generates multiple new plants quickly
- Maintain the new plant
Cons
- It can be difficult and time-consuming to do correctly
- Damage can occur to the root systems if not done carefully
- You may get unequal sections
Method 3: Stem Cutting

This method is the most preferred for Monstera propagation. It involves slicing stems below a node and putting them into soil or water with a rooting hormone.
This can be done in two ways: single-node cutting or multi-node cutting.
Single-node cuttings only have one leaf node, while multi-node cuttings have multiple nodes.
When using a single-node cutting, make sure the stem has an aerial root (a root that is above ground level). This helps with water absorption and nutrient uptake in the soil.
The rooting hormone will encourage new roots to form on the cuttings. Once rooted, you can transplant them into a pot of moist soil.
When propagating with a multi-node cutting, ensure there’re enough nodes on the stem for new roots to form.
This method also requires using a rooting hormone and keeping the soil moist during the rooting process.
Once established and rooted, you can transplant in individual pots of fresh soil.
Pros and cons of stem cutting
Pros
- Easy and requires minimal equipment or tools
- You can propagate many new plants from a single Monstera plant
- Quicker than other methods
- You can clone the parent plant, creating an exact replica
Cons
- Not all stem cuttings will successfully root and grow into new plants.
- Requires specific conditions
- Taking too many stem cuttings can stress the parent plant and affect its health.
Rooted Monstera Care Tips
Congratulations on propagating a Monstera. Here are some care tips to help you take care of your newly rooted Monstera:
Watering: Monstera plants prefer to be slightly moist but not waterlogged. Water your newly rooted Monstera regularly, but be careful not to overwater it.
Light: Provide your Monstera with bright, indirect light. Avoid direct sunlight, which can burn the leaves.
Humidity: Monstera plants prefer high humidity, so use a humidifier or place a tray of water near the plant to increase humidity levels.
Fertilizer: Fertilize your plant once every two to four weeks during the growing season with a balanced fertilizer. Do not over-fertilize, as this can cause damage to the plant.
Potting: Once your newly rooted Monstera has grown, you may need to repot it into a larger container. Use a well-draining soil mix and ensure the pot has drainage holes to prevent waterlogging.
Pest control: Monstera plants can attract pests like spider mites or mealybugs. Check your plant for signs of pests and treat it with insecticidal soap or a natural pest control method.
FAQs
Can you propagate a Monstera leaf?
No, you cannot propagate a Monstera leaf. However, you can propagate a Monstera plant by taking cuttings from an existing plant and rooting them in soil or water. This is done by snipping off a few healthy stems that are at least three inches long.
Is propagating Monstera without nodes possible?
No, propagating Monstera without nodes is not possible. Monstera reproduces vegetatively by producing aerial roots and nodes along its stems. The aerial roots help the plant climb, while nodes produce adventitious plantlets that can be cut off and propagated.
How do you encourage aerial root growth in Monstera?
You can encourage aerial root growth in Monstera with proper care. Here are some tips to help you get started:
– Increase humidity around the plant by misting it regularly or placing a humidifier nearby.
– Provide indirect light for your Monstera, such as bright, filtered sunlight or artificial grow lights.
– Allow the soil to dry out between waterings, as Monstera prefers moist soil.
– Provide adequate support for your Monstera’s aerial roots with a moss pole or trellis and use soft ties to keep them in place.
What does a Monstera node look like?
A Monstera node is a small, raised bump on the stem where a leaf emerges. It’s circular or oval-shaped and may be raised or flush with the stem. The node is usually a few millimetres in size and may have a slightly different texture or color than the surrounding stem.
Where is the node on a Swiss cheese plant?
Nodes are located along the stem where leaves are attached. Monstera plants have nodes spaced regularly along their stems, and each node will produce one or more leaves.
Conclusion
Air layering is a simple and effective way to propagate your Monstera plant and easily create new plants.
Following the steps outlined in this guide, you can successfully air-lay your Monstera and enjoy the satisfaction of watching new roots and leaves develop.
Whether a seasoned plant parent or a beginner, air layering is a great technique to add to your plant propagation arsenal.
So give it a try, and watch your Monstera collection grow.