Knowing how to waterproof the inside of a wood planter box is crucial. That’s especially if the planter’s wood surface is prone to rot. Also, waterproofing is helpful if you’ve got untreated wood planter boxes.
When outside on a balcony or patio, wood planters look fabulous. Unfortunately, they break down eventually since they’re a natural material.
So, to prevent that, it would help to do a wood treatment and waterproofing. But if you aren’t knowledgeable about waterproofing, this guide we’ll help you.
How to Seal a Wooden Planter Box Step by Step
Materials & supplies
- Newspaper
- Masking tape
- Thick plastic liner
- Flex Seal Spray/oil wood sealant/oil-based varnish
- Paintbrush
- Fine-grit Sandpaper
- Carpenter stapler
- Polyurethane/silicone caulk
- Scissors
- Measuring tape
Step 1: Prepare the planter box
Your wooden planter box will need prepping before starting its waterproofing process. So, pick fine-grit sandpaper and start sanding down your planter’s inside. Doing so roughens a varnished surface, creating better sealant adhesion.
Open a roofing cement tab, then scoop ¼ cup using a putty knife. Repeat that process, adding extra cement where need be. Do so until you’ve covered your wood planter’s inside.
Once you’ve prepped the exposed wood, brush away the dust. Otherwise, your sealant won’t adhere properly. So, don’t waterproof a wooden planter if there’s excess varnish residue. You can blow the persistent dust residue using compressed air.
But if a compressor isn’t available, opt for a paintbrush. Also, pressure-treated lumber can work well too. I say so since pressure-treated lumber increases a wood’s longevity.
Step 2: Seal the box
In this step, it would help to have some silicone caulk. Just squeeze some into the wood planter where its panels meet. Once you’ve applied your caulk, use your finger to smooth it. Doing so forms a seal, creating a smooth finish.
Once you’re done, let the silicone caulk dry for four days. But if you’re unsure of its curing time, check the packaging instructions. Also, ensure you’ve kept your wood planter box away from the following:
- Heat source.
- Moisture source.
During this sealing process, avoid using excess caulk.
Step 3: Apply the wood preservative
Once the caulk has cured, it’s time to apply the wood preservative. So, create straight lines using some masking tape. Do that if you don’t intend to paint the wooden planter box. Afterward, according to the instructions, apply the sealant/varnish to your wooden planter.
After varnish/sealant application, leave it to cure for four to six hours. So once the varnish has cured, apply another coat.
In some cases, it would help to apply a third coat. But to know that, please, refer to the varnish’s instructions.
After doing that, move to the bottom of your wooden planter box. Similar to the inside, paint the base of your wooden planter box. Do so using a clean cloth.
Wood shrinks when drying, increasing the lumber piece joints’ sizes.
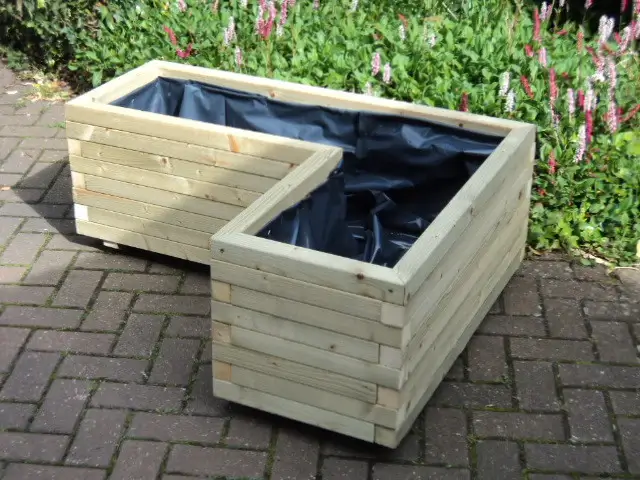
Step 4: Line the planter box
Use a thick plastic as your wooden planter box’s liner for this step. The thick plastic provides extra protection to your wooden planter box. The plastic liner makes your planter box waterproof.
Measure your wooden planter box’s sides and bottom using a tape measure. Once done, Cut a well-sized liner that fits your wooden planter boxes. Ensure the plastic liner lines up well with the planter’s one side.
Further, staple it in a position halfway up the planter’s inside. Afterward, flatten the liner until it completely covers the planter’s base. It would help if the plastic liner contoured adequately with the box’s inner side.
Place an extra staple on the base of your wooden planter. Doing so helps hold the plastic in position.
Step 5: Spread a permeable fabric to cover the drainage holes
Spread a tiny porous fabric piece over the wood planter’s drainage holes. Often than not, porous fabric material holds potting soil particles in place.
Pour the potting soil into your wood planter box. Only do that after spreading the porous fabric.
Those were the five steps one can use to waterproof a wooden planter.
How to stop wooden planters rotting?
1. Wood preservative.
Wood preservatives like linseed oil are suitable for protecting wood planters from rot. Moreover, combining wood preservatives with other treatments makes the process more successful.
You’ll need a paintbrush and a suitable wood preservative for this method/process. As per the instructions, apply your wood preservative. After that, you’re ready to go!
Further, because of global regulations, wood preservatives have similar ingredients. For that reason, any wood preservative will do a fabulous job.
Do a fungicidal wash to treat your wood planter box for better results.
2. Plastic liners.
Liners with no excess plastic inside your wooden planter minimize moisture contact. The plastic liners also help prevent wood rot in wooden planter boxes. Often, you can use the liners together with wood preservatives.
Afterward, the planter’s wood stops absorbing moisture/water. Elsewhere, liners prevent evaporation within planters that have extra airflow. Moreover, they’ll keep the potting soil intact.
3. Plastic inner containers
A plastic container within a wood planter is beneficial. That’s especially if its makeup comprises low-quality wood or without a drainage hole. Moreover, you can remove the plastic container from your wood planter. And that’s before watering.
That means moisture won’t contact your wooden planter box.
4. Planter stands
Placing wood planter boxes on planter stands is another rot prevention method. The planter stands will elevate your wooden planter. When they do that, they protect the planter from the water pool underneath.
5. Liquid sealants
Consider using liquid sealants if using plastic liners is challenging for you. Their makeup contains silicon which you can spray onto your wood planter.
6. Varnish
Also, the oil-based varnish is an effective way of conserving/protecting the wood. You can pick a stained or clear one. But never apply excess varnish. In short, varnish does the following:
- Wood protecting against water damage or otherwise rot.
- Brings out wood’s natural beauty by preserving its color.
7. Fiberglass
You can use fiberglass to seal your wood planter. But a few woodworkers prefer this method. That’s so since working with fiberglass can be messy. Also, you’ll risk your health when using fiberglass,
8. Waterproof paint
Another planter rot protection method is the waterproof paint application. The paint preserves the planter’s wooden look. Moreover, ensure you’ve treated your wooden planter using a fungicide. Do that before the waterproof paint application.
9. Placement
After waterproofing the inside of your planter, it’s time to replicate that on the outside. You can do so by putting a placement of the following:
- Planter stands.
- Waterproof paint.
- Oil-based varnish.
- Wood preservative.
10. Type of wood
If you’ve got a choice, pick a wooden planter box made of naturally rot-resistant wood. Such wood materials come from the following:
- Redwood.
- Oak.
- Ipe.
- Cedar
Related: Best Wood for Planter Box
Why You Need To Waterproof Your Outdoor Wood Planter Boxes
Keeps Your Plants Healthy
Potted plants may not get enough moisture supply when the wooden planter leaks. On the other hand, the same plants can drown if the planter holds excess moisture. So, waterproofing your wood planter box helps keep the following healthy:
- Greenery.
- Vegetables.
- Flowers.
Extends the Life of Your Planter
Your wooden planter may need protection since you expose it to different elements. Thus, too much moisture weakens the planter’s structure, causing rot. That’s whether the moisture is from water sprinklers or rain.
Rotting wooden planters don’t make suitable accent pieces for your yard, not to mention. So, waterproofing the boxes boosts their durability.
Maintains the Surrounding Area
If you’ve got a wood planter that leaks moisture, it’ll water damage the underneath surface. Patch the wood planter’s leaks and apply a waterproof membrane. Doing so keeps the wooden deck, concrete patio, or grass dry.
FAQs
Do I Need To Line My Wooden Planter Boxes?
It would help to line your metal or wood planter boxes. The plastic liner helps boost your planter’s life. But using a liner isn’t necessary if you’ve got a planter mad of the following:
- Concrete.
- Ceramic.
- Plastic.
That’s because planters made of the above materials are extra durable.
How do you line the inside of a wooden planter box?
To protect your wood planter, line it inside with plastic. For example, you can line the wooden planter with a plastic bag (compost). But it would help to fix the bag using small nails. Also, drill some drainage holes before you fill it using compost.
How do you seal the inside of a planter?
Sealing your wooden planter box using an oil-based sealant spray or wood preservative is the best way to keep it from rotting. Also, you can waterproof it by adding a plastic liner to its inside. The plastic liner reduces contact between your wooden box and the moist soil.
What should I use to line a wooden planter box?
You should use a porous landscape fabric to line your wooden planter box. This fabric allows moisture to drain out of your wood container. While doing that, the fabric also prevents direct contact between the wood and wet soil.
Further, the fabric prevents the soil from going out of the planter through gaps.
How do you waterproof a box inside?
You can use the following varnishes to create cardboard waterproof:
- Lacquer spray sealer.
- Clear acrylic paint.
- Polyurethane coating.
The above protective coatings are harmless. But apply them within well-ventilated spaces since they’re flammable.
Related: How long can plants stay in nursery pots before planting
Conclusion
That’s how to waterproof the inside of a wood planter box. So, if you follow the mentioned steps, your wooden planter will last longer. Further, the wood planter can go beyond ten years with yearly maintenance or touch-ups.
All that depends on the planter’s wood type. Thus, choose a planter with a wood material that’s naturally rot-resistant.